


Before you even think about polishing that scratch out of your watch crystal, you need to play detective. The single most critical part of the entire job is figuring out what material you're working with: acrylic, mineral, or sapphire.
Using the wrong polishing compound is a fast track to disaster. An acrylic polish won't touch a mineral crystal, and a diamond paste meant for sapphire will absolutely shred a soft acrylic one. Let's make sure your watch gets the right treatment from the start.
Identifying Your Crystal Material
You don't need a lab to figure this out—just your senses. The three common crystal types each have a distinct feel, sound, and even a unique way of handling a drop of water.
- Acrylic (Plexiglass): Common on vintage and some retro-style watches. It feels warm and almost soft to the touch. Give it a light tap with your fingernail; you'll hear a dull, plastic-like thud. These are notorious scratch magnets.
- Mineral Glass: The workhorse of the watch world, found on most mid-range timepieces. This is essentially tempered glass. It feels cool and solid, like a windowpane. A tap produces a sharper, higher-pitched sound than acrylic.
- Sapphire: The undisputed king of scratch resistance, standard on virtually all luxury watches today. Synthetic sapphire feels very cold, dense, and slick. When you tap it, you get a solid, high-pitched "clink." The best party trick is the water drop test: a droplet will bead up into a tight, perfect little dome on sapphire. On mineral or acrylic, it will spread out and flatten.
This flowchart breaks down the simple tests you can use to nail down your crystal type.
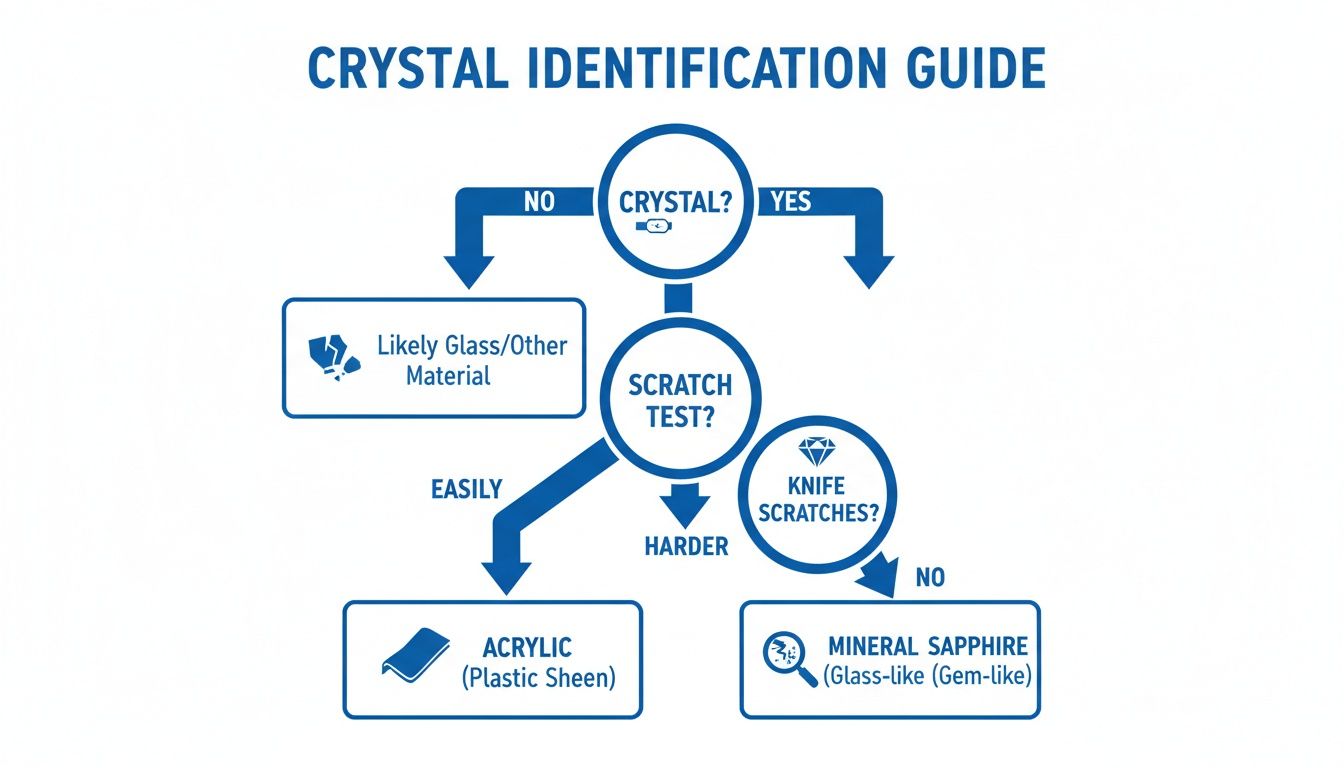
As the chart shows, a few simple sensory checks are usually all it takes to get it right.
To make it even easier, here’s a quick-reference table to help you distinguish between the different materials at a glance.
Watch Crystal Identification Guide
| Crystal Type | Key Characteristics | Simple Test | Commonly Found On |
|---|---|---|---|
| Acrylic | Warm, lightweight, plastic feel | Dull "thud" sound when tapped | Vintage watches, some modern field watches |
| Mineral | Cool, solid, glass-like feel | Sharp, resonant tapping sound | Most mid-range and fashion watches |
| Sapphire | Very cold, dense, slick surface | High-pitched "clink" sound, water beads up | Luxury and high-end modern timepieces |
Taking a moment to perform these tests will save you from a costly mistake and set you up for a flawless polishing job.
Assembling Your Polishing Toolkit
Once you know your crystal type, it's time to gather your supplies. A clean, organized workspace is your best friend here—it prevents needless mistakes and protects your watch from accidental damage.
Key Takeaway: Using the correct, material-specific polish is non-negotiable. There are no "one-size-fits-all" solutions in proper watch care. What beautifully restores an acrylic crystal will be useless on mineral glass and can even strip away anti-reflective coatings.
Here’s your essential checklist:
- The Right Compound: Use PolyWatch for acrylic, cerium oxide slurry for mineral glass, and a fine-grit diamond paste for sapphire.
- Masking Material: Don't skimp here. Get high-quality painter's tape to meticulously protect the bezel, case, and lugs.
- Applicators: A set of clean, soft, lint-free microfiber cloths is a must.
- Cleaning Solution: Have a gentle watch cleaner and a separate cloth ready to remove all grime beforehand and polishing residue afterward.
Protecting the area around the crystal is just as important as the polishing itself. For more tips on keeping your watch pristine, check out our comprehensive guide to cleaning your Rolex watch for best practices.
Removing Scratches from Acrylic Crystals
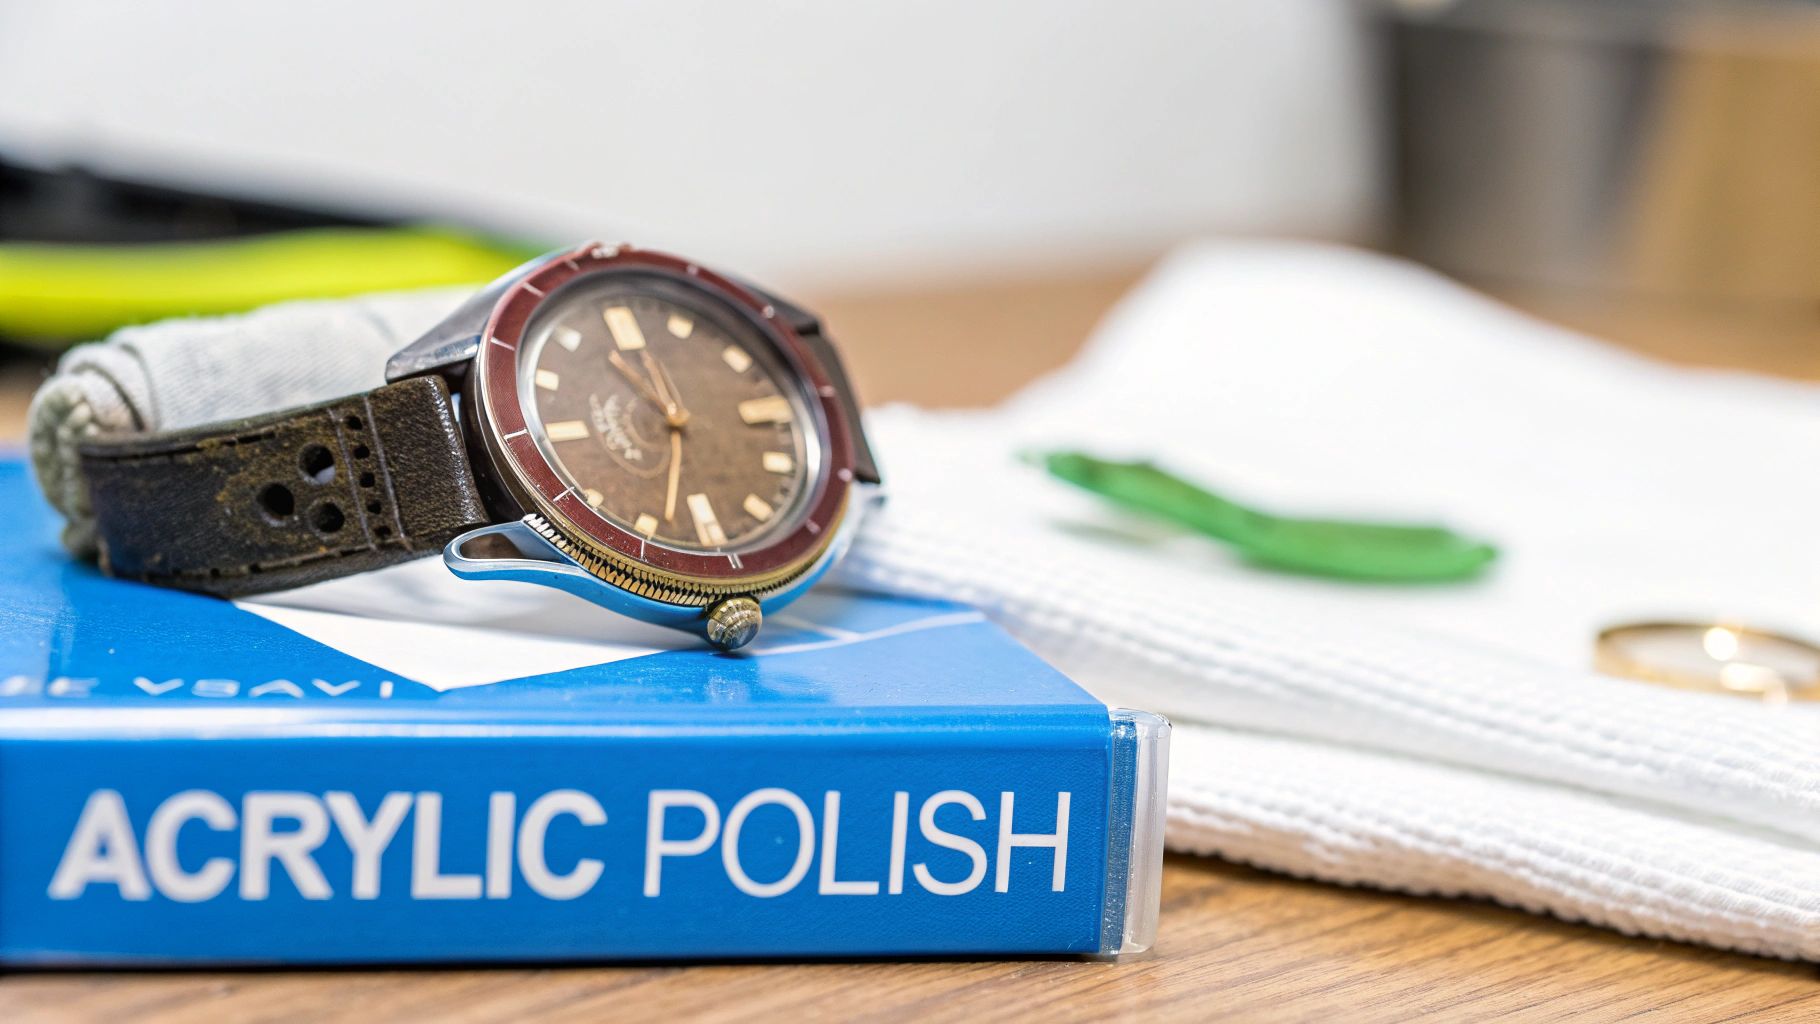
If you've figured out your watch has an acrylic crystal, you're in luck. This material—often called plexiglass or Hesalite—is the most forgiving for a first-time DIY polish. Its softness means it scratches easily, but it also means those scuffs can be buffed out with incredible success, bringing back that classic, warm clarity.
Unlike harder crystals that need aggressive abrasive compounds, polishing acrylic is more about gently smoothing the surface. It's less like sanding down a rough edge and more like burnishing leather. You're just leveling the plastic until light can pass through cleanly again, making those hairline scratches vanish.
Protecting Your Watch Before You Begin
The absolute number one rule before you even think about touching polish is to protect the parts of your watch you don't want polished. Stray compound can easily mar the finish on a bezel or get stuck in the case crevices, giving you a whole new problem to deal with.
Grab some high-quality painter's tape and meticulously mask off the entire bezel right up to the crystal's edge. Seriously, don't rush this part. A few extra minutes of careful taping will save you from an hour of regret later. You can even tape over the lugs and crown for extra peace of mind.
Applying the Right Polish with the Right Technique
For acrylic crystals, the undisputed champion is PolyWatch. It’s a specialized paste made specifically for this job. A single tiny tube holds enough polish for dozens of fixes.
- Start with a Clean Surface: First things first, give the crystal a thorough wipe with a clean microfiber cloth. You need to get rid of any dust, oils, or grit. Trapped debris can create new scratches while you're trying to remove old ones.
- A Little Goes a Long Way: Squeeze a tiny dab of PolyWatch—about the size of a grain of rice—right onto the center of the crystal. Using too much just creates a mess and wastes the product.
- The Circular Motion: Take a fresh, soft microfiber cloth, wrap it around your index finger, and start buffing the paste into the crystal. Use small, firm, circular motions. The key here is consistent pressure. It should be firm enough to work the polish in, but not so hard that you risk stressing the crystal or its gasket seal.
Keep this circular buffing going for about two to three minutes. You'll start to feel a little warmth from the friction, which is a good sign—it means the polish is doing its job. The paste will slowly disappear as you work it into the surface.
Personal Insight: You can feel when the pressure is right. It’s a balance between aggressive buffing and a gentle polish. Your finger will probably get tired, but that means you're applying enough force to actually smooth out the plastic.
Checking Your Progress and Repeating the Process
After your first two-to-three-minute pass, stop. Use a clean section of your cloth to wipe away all the residue. Now, hold the watch under a bright light and look at the crystal from every possible angle.
You should see a real improvement. Most of the finer, hairline scratches should be gone or at least much less visible. Deeper scuffs might still be there, and that's completely normal. This is a repetitive process; you'll almost certainly need a few more rounds for a perfect finish.
Just reapply another small dab of PolyWatch and repeat the buffing, focusing your energy on any areas that still show scratches. After each pass, clean and inspect. For a moderately scuffed crystal, plan on repeating this cycle three to five times. Patience is your best friend here.
The skills you learn restoring a watch crystal can often be used for other clear surfaces. For some related tips, you can check out how to remove scratches from eyeglasses for other safe, simple fixes. That knowledge can come in handy for more than just your timepiece.
A Careful Approach to Polishing Mineral Glass
Alright, if you thought acrylic was a walk in the park, get ready for a completely different challenge. We're now talking about mineral glass, the workhorse crystal found on everything from vintage Seikos to modern fashion watches.
Mineral glass is heat-tempered, making it far tougher against scratches than acrylic. But it's not scratch-proof. Removing damage from this material requires more than just a gentle buff—it demands a specialized compound, a good deal of patience, and some real elbow grease. You're not just smoothing the surface; you're methodically grinding it down on a microscopic level.
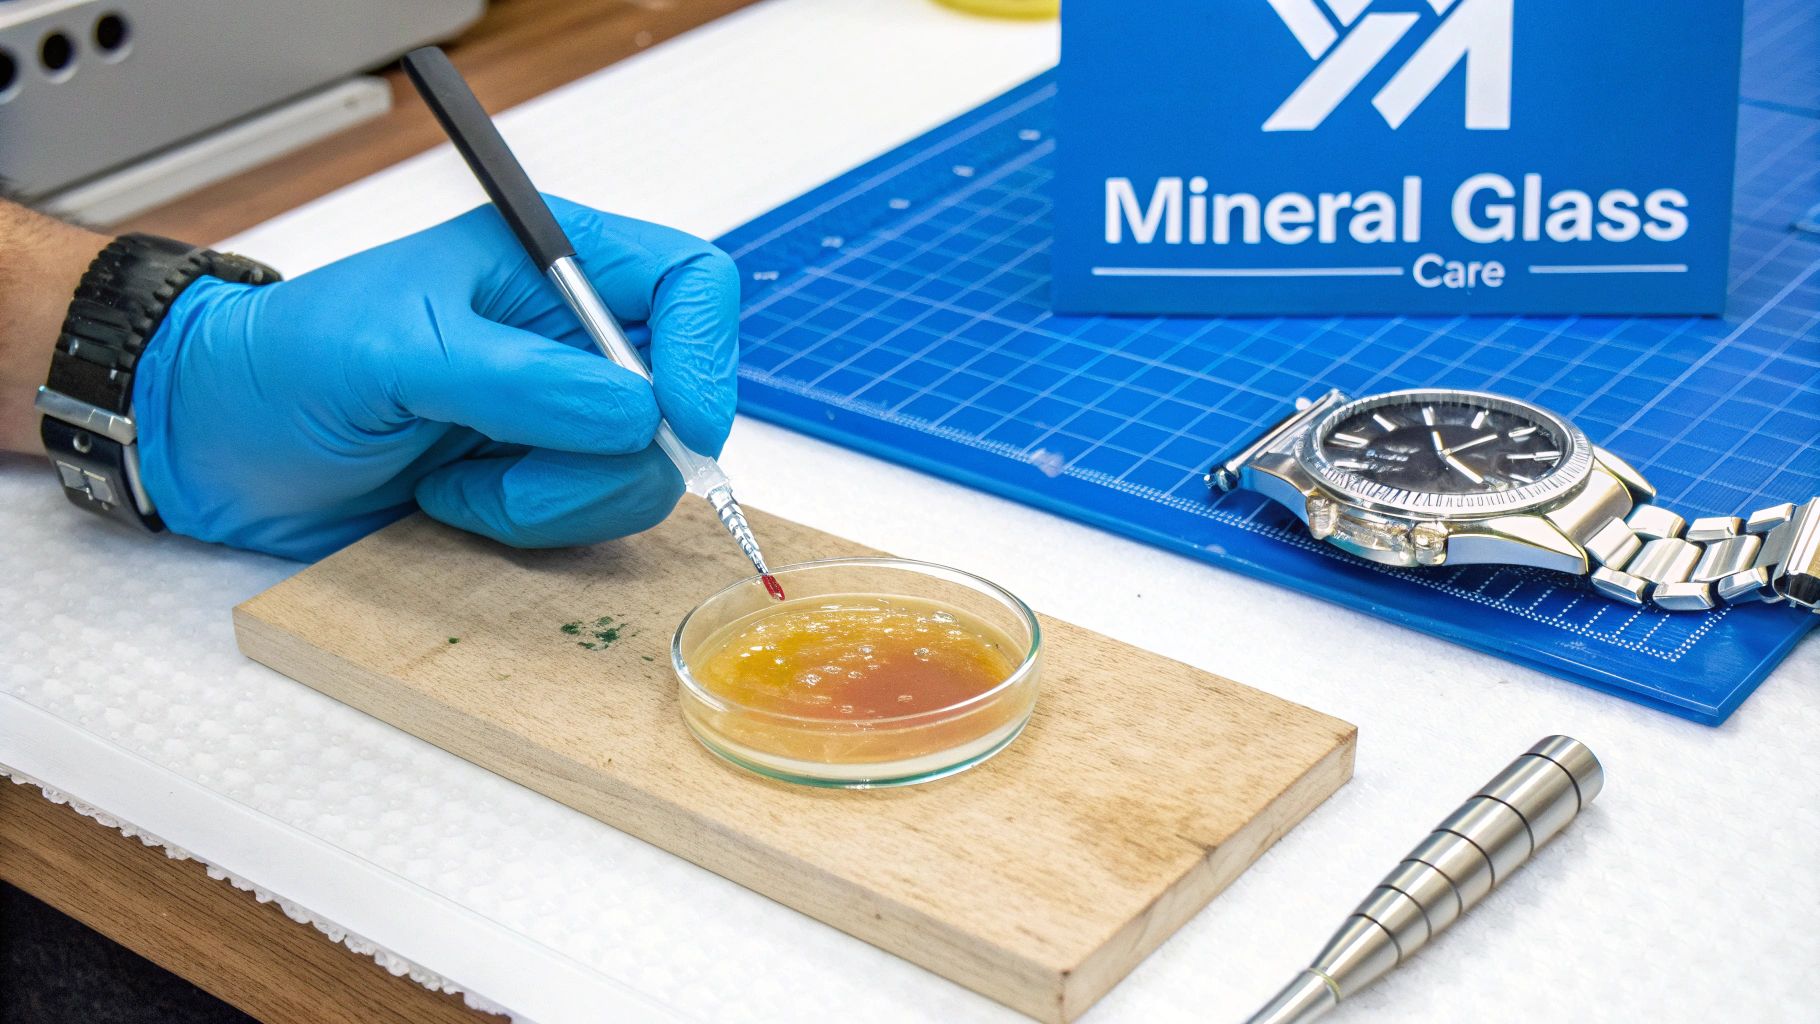
Mastering the Cerium Oxide Slurry
Your secret weapon for this job is cerium oxide. It’s a fine, white powder that transforms into a potent polishing slurry when mixed with water. Think of it as liquid sandpaper made specifically for glass.
Getting the consistency of this mixture right is everything. It's the foundation of a good result.
- Too Watery: A runny mix won't have enough abrasive power. The particles will just slide across the glass without cutting into the scratch, and you'll be rubbing for hours with nothing to show for it.
- Too Pasty: A thick, clay-like paste is a nightmare to work with. It dries out quickly from the friction, leading to an uneven polish and potentially creating a haze of new micro-scratches.
You’re aiming for a creamy texture, something like toothpaste or a thick lotion. Start with a bit of powder in a small dish and add water literally drop by drop, mixing as you go. This perfect slurry will cling to the crystal and deliver consistent, effective abrasion.
The Art of Hand Polishing Mineral Glass
Once your watch bezel is safely taped off and your slurry is mixed, it’s go-time. This isn’t about speed; it's about steady, deliberate effort. You need to apply consistent and firm pressure to work the abrasive across the scratch.
Wrap a clean, lint-free microfiber cloth around your finger, scoop up a dab of the slurry, and get to work on the crystal. Use firm, circular motions, making sure you cover the entire damaged area. You’ll need to press much harder than you did with acrylic—enough that you can feel a bit of warmth building up.
Crucial Warning: Heat is your enemy here. While some friction is necessary, too much can distort the mineral glass or, in a worst-case scenario, cause it to crack. Polish for no more than three minutes at a stretch, then stop. Wipe the crystal clean, let it cool down completely, and inspect your progress under a bright light.
Do not skip that cool-down period. It’s essential for protecting the crystal and for letting you see what's actually happening. You'll likely have to repeat this three-minute polish-and-cool cycle several times to completely erase a moderate scratch. This is a marathon, not a sprint.
Achieving a Flawless, Uniform Finish
One of the biggest mistakes people make when polishing mineral glass is creating an uneven surface. If you focus all your pressure on one deep scratch, you can easily grind a noticeable dip or "wave" into the glass. This will distort your view of the dial forever.
To prevent this, you have to blend your work. Even after the main scratch is gone, continue polishing the entire crystal surface with lighter pressure. This ensures the whole thing remains perfectly flat, just like it came from the factory. A final, light pass over the whole crystal will restore that brilliant, uniform clarity.
A final word of caution: be aware of any anti-reflective coatings. If your watch has an outer AR coating (it often has a faint blue or purple sheen), this polishing process will remove it. There's no way around it. Restoring that coating is a job for a professional service center.
Tackling Surface Scuffs on Sapphire Crystals
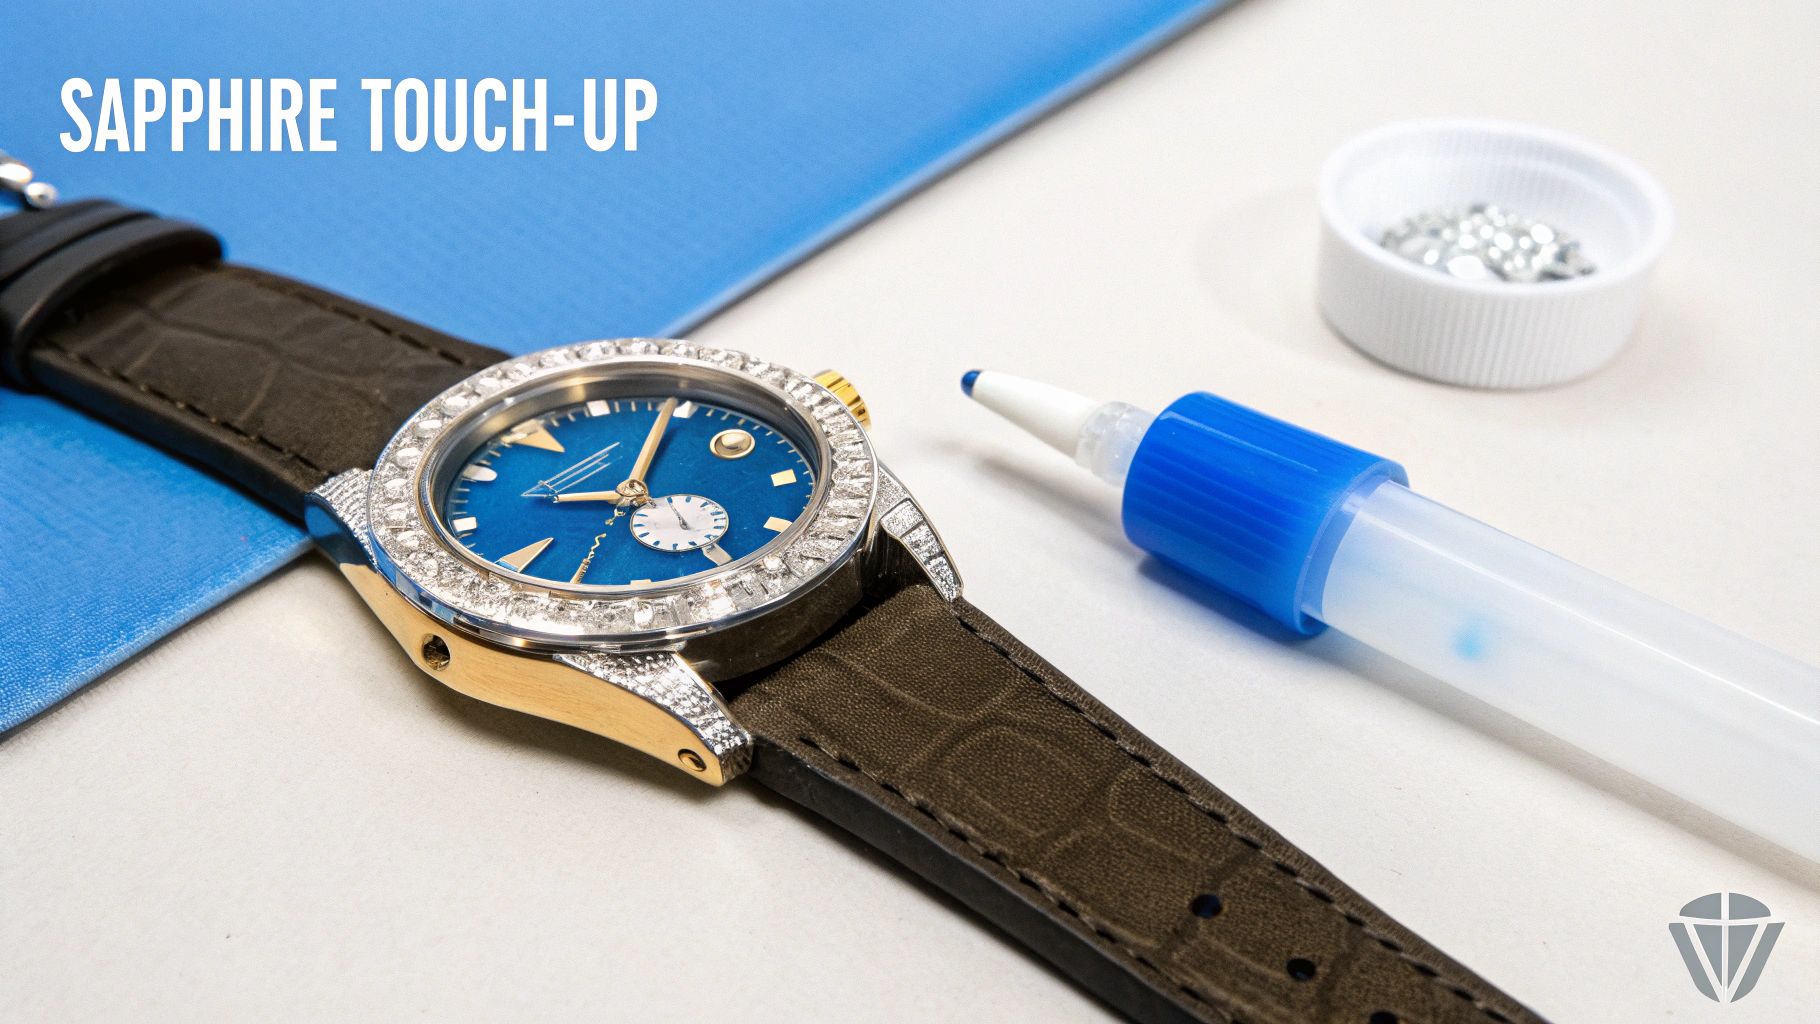
We've finally arrived at the big boss of watch crystals: sapphire. This isn't just glass; it's a synthetic marvel, one of the hardest substances on earth. Its incredible toughness is why it's the gold standard for luxury watches, but that same strength makes polishing a serious, high-stakes undertaking.
Let me be clear: polishing sapphire is nothing like buffing a scuff out of acrylic. Because it's so hard, you need an equally hard abrasive to make a dent. That means stepping up to diamond paste. The risk of permanently ruining the crystal's perfectly flat surface is very real, which is why this is a job reserved for only the faintest, most superficial scuffs.
The Right Tools For An Unforgiving Material
Before you even think about starting, you have to understand the precision required. The goal is to remove a microscopic layer of sapphire without creating waves or distortions.
Here’s exactly what you’ll need:
- Diamond Polishing Paste: This is non-negotiable. Get a couple of different grits, starting with a very fine 3-micron paste and a 1-micron paste for finishing. Do not start with anything coarser.
- Wooden Polishing Stick or Hard Applicator: A soft cloth just won't cut it. You need a small, flat wooden stick or a specialized hard polishing lap to apply focused pressure.
- High-Quality Masking Tape: Just like with the other crystals, protecting the bezel is everything. One slip with diamond paste can instantly scratch or dull a metal finish.
- Microfiber Cloths: Have several clean ones ready for wiping away paste and inspecting your work.
This whole process is about finesse, not force. You are gently abrading the surface with microscopic diamonds, which is a world away from the simple buffing motion used for acrylic.
The High-Stakes Polishing Technique
Once you've meticulously taped off the bezel and case, you can begin. This is a slow, methodical process that demands your full attention. No distractions.
Put a tiny dab of the 3-micron diamond paste on the tip of your polishing stick. Using firm and consistent pressure, work the paste over the scuff in small, controlled circular motions. Unlike with softer materials, you won't feel much happening—the cutting action is on a scale you can't really feel.
Keep this up for about three to four minutes, then stop. Wipe the crystal completely clean with a fresh microfiber cloth and inspect it under a bright, direct light. Look for any change in the scuff. If you see some improvement, you can repeat the process. If you notice new, much finer scratches appearing, it means you've successfully abraded the surface and can move to the finer 1-micron finishing paste.
Crucial Insight: Your goal is not to eliminate the scratch in one go. You are gradually and evenly wearing down the crystal surface until it's level with the bottom of the scratch. Rushing this will create a wavy, distorted finish that looks far worse than the original mark.
Knowing The Limits And When To Stop
The honest truth is that DIY sapphire polishing is for minor touch-ups only. Did you know that sapphire crystals dominate a global market valued at USD 3.12 billion in 2024? That’s because their scratch resistance, a 9 on the Mohs scale, is legendary. For owners of a Rolex Submariner or Patek Philippe Nautilus from a place like ECI Jewelers in NYC's Diamond District, knowing these limits is key to preserving value. You can dig deeper into the sapphire crystal market and its growth here.
Here's the hard rule: if you can feel a scratch with your fingernail, it's too deep for a DIY repair. Trying to remove it means taking off so much material that you'll inevitably create a visible distortion. That’s the clear line where you need professional help.
Deciding whether to tackle a polish yourself can be tricky. This table should help clarify when to go for it and when to call in an expert.
DIY vs Professional Polishing: When to Choose
| Crystal Type | Scratch Severity | Recommended Action | Associated Risks |
|---|---|---|---|
| Sapphire | Faint surface scuff (not catchable with a nail) | DIY Attempt (with caution) | High risk of creating a wavy or uneven finish. |
| Sapphire | Any scratch you can feel, chip, or crack | Professional Service | Risk of catastrophic crystal failure, loss of water resistance. |
| Mineral | Moderate scratches | DIY Attempt | Risk of overheating, uneven polish, removing AR coating. |
| Acrylic | Most light to moderate scratches | DIY Attempt | Low risk; over-polishing could slightly thin the crystal. |
When it comes to a valuable luxury watch, the safest bet is always professional servicing. A true expert has the proper lapping machines to guarantee a perfectly flat, factory-spec finish, which is the only way to properly protect your investment for the long haul.
When to See a Professional Watchmaker
Knowing how to polish a watch crystal at home is a fantastic skill, but true wisdom lies in recognizing when a job is best left to an expert. Trying to fix certain types of damage yourself can quickly turn a correctable flaw into an irreversible problem—costing you far more in the long run.
The reality is, DIY polishing has its limits. It’s perfect for the light scuffs and hairline scratches that build up from daily wear. But once the damage goes beyond the surface, the risks of a home repair start to outweigh the benefits.
Identifying Damage That Requires an Expert Eye
So, when should you put down the polishing cloth and pick up the phone? There’s a simple, universally accepted trick every watch owner should know: the fingernail test.
Run your fingernail gently across the scratch. If it catches in the groove, even slightly, the scratch is too deep for a safe DIY repair. Trying to polish out a gash that deep means removing a significant amount of material, which will almost certainly create a visible distortion or "wave" in the crystal's surface.
Beyond the fingernail test, here are other clear signs that professional help is needed:
- Chips or Nicks: Any chip, especially around the edge, compromises the crystal's structural integrity. Polishing can't fix this, and applying pressure could easily cause the chip to spread or the crystal to shatter.
- Cracks: A crack of any size is a critical failure. It means the waterproof seal is broken, leaving your watch's delicate movement vulnerable to dust and moisture. This requires immediate professional replacement, no exceptions.
- Compromised Coatings: If your watch has an anti-reflective (AR) coating on the outside of the crystal (often visible as a faint blue or purple hue), a deep scratch has cut right through it. DIY polishing will strip this coating away unevenly, leaving a patchy, unsightly mess that only a pro can fix.
It's crucial to know when a task is beyond your scope. As restoration experts note, some commonly restored items are better left to professionals to avoid permanent damage. A valuable timepiece absolutely falls into this category.
The True Value of Professional Servicing
Choosing a professional watchmaker, like the certified technicians at ECI Jewelers, isn’t just about having better tools—it’s about leveraging years of specialized expertise. A professional service center offers solutions that are simply out of reach at home.
When you bring your watch to an expert, they don't just buff out a scratch. They follow a meticulous process designed to restore your timepiece to factory specs without compromising its value or function.
Expert Insight: A critical part of professional crystal restoration is pressure testing. After a crystal is polished or replaced, a watchmaker uses specialized equipment to verify that the watch's water resistance is fully intact. This is a vital step you can't replicate at home, and it's essential for protecting your investment.
What a Watchmaker Does Differently
A pro has industrial-grade lapping machines that ensure a perfectly flat, distortion-free finish. That’s something nearly impossible to achieve by hand, especially on hard materials like sapphire.
Here’s a glimpse into the professional process:
- Careful Disassembly: The movement is almost always removed from the case to protect it from the intense vibration and microscopic particles generated during polishing.
- Precise Abrasion: Using a series of progressively finer diamond-impregnated laps, the watchmaker evenly grinds the crystal surface down just enough to completely remove the scratch.
- Flawless Finishing: The crystal is then polished on different laps to restore its original, mirror-like clarity and perfect optical properties.
- Gasket Inspection and Replacement: The gasket sealing the crystal to the case is inspected and often replaced to guarantee a perfect, factory-tight seal.
- Pressure Testing: Finally, the reassembled watch is subjected to both vacuum and pressure tests to confirm its water-resistance rating. You can learn more about what goes into professional servicing and potential costs in our guide to understanding Rolex watch repair expenses.
Ultimately, while handling minor scuffs yourself can be rewarding, protecting a valuable timepiece sometimes means admitting a job is too big to handle. For deep scratches, chips, or any damage on a high-end luxury watch, seeking professional service isn't an admission of defeat—it's the smartest move you can make.
Common Questions About Polishing a Watch Crystal
Even with a solid plan, it's normal to have a few lingering questions before you start working on a watch you care about. Getting these details right is what separates a fantastic restoration from a costly mistake.
Think of this as the troubleshooting guide I wish I’d had when I first started. Let's clear up some of the most common myths and concerns that come up.
Can I Use Toothpaste to Polish My Watch Crystal?
This is probably the most common DIY "hack" you'll find online, and my answer is always the same: please don't. While it sounds clever in theory—toothpaste is abrasive, after all—it's a terrible idea for a watch crystal.
The problem is that the abrasives in toothpaste have completely random and inconsistent grit sizes. On a softer acrylic crystal, this just creates a new mess of fine micro-scratches, leaving you with a hazy, cloudy finish that looks far worse than when you started.
For harder mineral or sapphire crystals, toothpaste doesn't have nearly enough cutting power to do anything at all. Best case, it's a waste of time. Worst case, you could damage the anti-reflective (AR) coating. Just stick with a purpose-made product like PolyWatch for acrylic; it's the right tool for the job.
How Can I Tell If My Watch Has an Anti-Reflective Coating?
An anti-reflective coating is a great feature for reducing glare, but it’s a showstopper for DIY polishing. The easiest way to check for one is to hold your watch at an angle under a bright light.
If you see a distinct blue, purple, or greenish hue on the surface, that's almost certainly an outer AR coating. It's a microscopic layer applied right on top of the crystal, and any abrasive will strip it right off—usually unevenly.
Once you start removing an AR coating, you're left with a patchy, ugly finish that can only be fixed by replacing the entire crystal. If you see that tell-tale colorful sheen, your safest bet is to stop and talk to a professional.
Will Polishing Affect My Watch’s Water Resistance?
When done properly, polishing the crystal's surface won't break the water-resistant seal. That seal comes from a tiny gasket seated between the crystal and the case.
However, the risk comes from applying too much pressure. If you're really bearing down on a deep scratch, it's possible to deform or compromise that gasket. This is exactly why we say any scratch deep enough to catch your fingernail should be handled by a pro.
Professional servicing isn't just about the repair itself. Afterward, we pressure-test the watch to certify its water resistance rating is intact. That's a level of peace of mind you just can't get from a home repair.
How Often Should I Polish My Watch Crystal?
You should think of polishing as a corrective procedure, not routine maintenance. It's something you do only when the scratches become too distracting to ignore. Every time you polish, you are physically removing a microscopic layer of material from the crystal.
This is especially critical for acrylic crystals. They're easy to restore, but polishing them again and again over the years will eventually make the crystal thinner. Prevention is always the best strategy. Simply being mindful of how you wear and store your watch will go a long way. Protecting your timepiece is key, which is why we put together a guide on choosing the best travel case for watches.
For any deep scratches, chips, or work on a valuable luxury timepiece, the safest and smartest choice is always professional service. At ECI Jewelers, our certified watchmakers have the expertise and equipment to restore your watch to factory standards while guaranteeing its water resistance and value. Contact us today for a consultation on professional watch servicing.


